GET IN TOUCH.
Want to learn more? For more information or a quote on our products or services, please contact us.
These lessons are probably similar to Dropbox, GoogleDrive and other cloud storage programs, too.
When creating your OneDrive account, take note of the OneDrive location shown on this screen and highlighted below with a green box:

(NOTE - Above, RDI MA Device may be replaced by the account name of the user that is currently logged into the device.)
UNCHECK the bubble associated with the "Documents" folder on this screen:

The screen should look like this BEFORE you click "Continue".

You cannot just drag and drop RDI files or RDI folders from your computer to OneDrive. You also cannot Upload files to OneDrive. Using either of these transfer methods will "break the link" between Motion Explorer and the recording files. Motion Explorer will no longer know where to locate the recordings. Because the hierarchy.db file no longer exists in your C:UsersRDI MA DeviceDocumentsRDIHierarchy folder, Motion Explorer will create a new (empty) hierarchy tree.
To Synchronize your recordings with the OneDrive folder follow these steps:
Use Motion Explorer to "Move" the files to the newly created OneDrive folder. Open Motion Explorer and select the Recording, Asset, Folder or Collection you want to move. The current location will be shown under the Preview Image in the right-hand page. Highlighted below with a green box.

Select the "Move" menu item:

You will be shown the "Destination Directory for File Move" window below:

Click the three dots in the blue box and a navigation window will appear. Navigate to the "OneDrive - XXX XXXXXXX" folder. If one does not exist already, create an "RDI" folder inside your OneDrive folder. Select the RDI Folder:

The new path should appear in the "Destination Directory" window. Confirm this location and click OK:

When you click "OK" you should see a progress bar similar to this:

When the process completes, Motion Explorer should see the Location change to the OneDrive location as shown in the green box below:

Please, Please, PLEASE, be careful to not delete files. They are extremely large and may not be saved in the computer's recycle bin or the OneDrive recycle bin.
You may see this message but I have seen other cases where the files are completely deleted and unrecoverable:

While we are not necessarily experts at every type of cloud storage offering, we will be happy to help as much as possible to prevent you from losing data unnecessarily.
After you have all of the recordings stored on OneDrive, you can point the Storage Location on the Acquisition Device to store future recordings there by default.
Open RDI Acquisition and click on the "Settings" gear:

In the "RDI Acquisition Options" window, click on the "Browse..." button at the end of the "Storage folder:" line:

Use the "Browse For Folder" to navigate to and select the "OneDrive - XXXXXXXXXX" folder. Select the RDI Folder and click OK:

Related articles:
What is the difference between "Move" and "Import/Export" when using Motion Explorer?
If you're seeing this error:

Please check your file name(s) for the following invalid characters. You'll have to use characters supported by Microsoft.

One other possibility is that there is an "extra" space after one of your file names. You might see something like this:

This will cause a problem with the folder associated with this recording. If you have trouble renaming this recording, please contact [email protected] and we'll do our best to help.
1. Open the “RDI Motion Amplification” program.

![]()
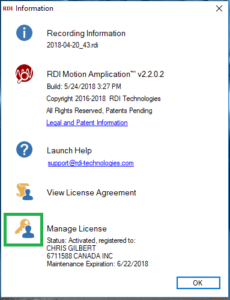
3. From the Information window, click on the “Key and Silhouette” icon to the left of “Manage License – Green box below.

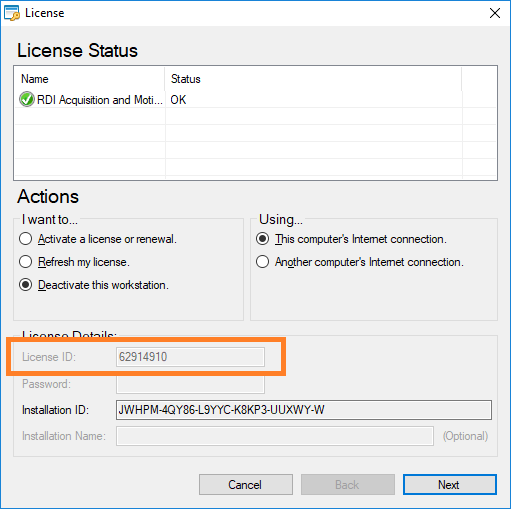
4. In the “License” window, verify the “License ID” number shown in the orange box below.

Installing new software or updating your existing version will follow the same procedure as described below:
READ THIS FIRST:
1. Before starting the installation process: Please be aware, your software support must be current. You can check your expiration date by following these instructions. If you have any questions about your software support please email [email protected].
2. Please check the Microsoft BitLocker encryption setting on your computer BEFORE starting this process. If the BitLocker is turned ON and you do NOT have the key, you will lock up your hard drive and lose all of your data!!
Follow these instructions to check and disable the BitLocker if you do not intentionally have it turned on.
3. Click on the following link for the software bundle you are trying to update or install
Software Installation Package for all Iris M, Iris MX, and Iris CM Installations
4. When the download has completed, open the Downloads folder
5. Copy the "MA+v3.5.0+Install.zip” file to a USB device (Optional)
6. Take the USB drive to the RDI Technologies™ Acquisition Device (Optional)
7. Copy the “MA+v3.5.0+Install.zip” file to the desktop of the RDI Acquisition Device (Optional)
8. Right-click on the “MA+v3.5.0+Install.zip” file and select “Extract All…”
NOTE - The extracted files must be on the local computer. You cannot install from the USB drive or a network location.
9. Confirm the default desktop destination by clicking “Next”
10. When extraction is complete, the extracted file location should open automatically
11. Right-click on the “setup.exe” file
12. Left-click on the “Run as administrator” action
13. Files downloaded from the internet will probably display the following caution message:

14. Click on the "More Info" link highlighted in Green below:

15. After you click the More Info link, you will see details about the publisher, it should read "RDI Technologies Inc". The "Run Anyway" button will appear. Click Run Anyway to begin the installation.

16. Follow the on-screen prompts to complete the software upgrade or installation
NOTE - The download contains the newest version available. In some cases the version references above may not exactly match the version in the download which will always be the newest version. In any case, the instructions remain the same regardless of the version that you download.
Related articles
Where can I find the details of my software licenses?
How many computers may I install the RDI Iris M software on?
What are the minimum computer requirements for installation of the Stand Alone Analysis Software?
There are several instances where you may be asked to enter your software license after the system has been running.
First, make sure that the Acquisition System or Analysis Only computer is connected to the Internet.
In some cases, the time on the computer will get out of sync. You may see a message about "The system time is not valid."

The first thing you should check is that the date and time on your computer matches the current date and time. Assuming the computer is behind, adjust the date and time. Do this by right-clicking on the date and time in the system tray and select "Adjust date/time" from the pop-up menu.

Depending on your current settings, you may have to disable the "Set time automatically" button to manually adjust the time. Sometimes, simply changing the "Set time automatically" toggle will actually correct the time.

Close and save the time then try to re-open the RDI Technologies™ Software.
If you are presented with the licensing screen and the License ID is already filled in, check the center bubble for "Refresh my license" and then click "Next." This should reactivate your software.

If you are presented with the licensing screen and the License ID is NOT filled in, please try re-entering the License ID and password that was provided with your system. Please see the article, "Where can I find the details of my software licenses?" for how to find your original credentials.

In some cases, the software will display the message "The license could not be saved. Access to the path 'C:ProgramDataRDIRDISystemLicense.lfx' is denied."
There are two solutions available for this:
1) Update to Version 3.0.2.0 or newer by clicking on the "How do I update my Iris M™ software?" link
2) Create the RDI folder by:
Related articles:
Where can I find the details of my software licenses?
How many computers may I install the RDI Technologies™ Iris M™ software on?
This will normally happen after you try to update from one version to another. In that case, if you do not have a current Software Support Agreement with RDI Technologies™, the software will prevent you from running the newer version. The only way to resolve this issue is by uninstalling the newer version of software and reinstalling the original version.
To prevent this, you can check the expiration date of your Software Support Agreement BEFORE you update any software.
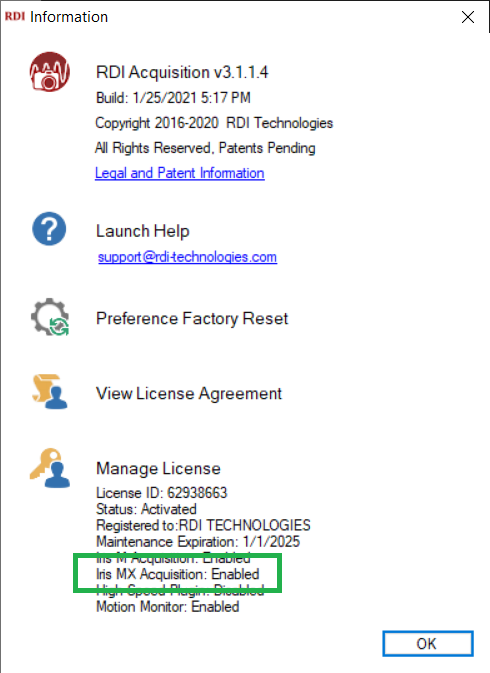
The expiration date will be shown on the "Information" screen shown below. To open it, click the "i" inside the blue circle in the upper right-hand corner of any one of the RDI Software applications, highlighted by the green box below. The expiration date will be at the very bottom under "Manage License" as shown in the bottom green box.

Related Articles:
Where can I find the details of my software licenses?
Typically, you will see the background lights on the keyboard illuminate but there will be nothing on the screen. You can try these steps:
Please also see these instructions from Microsoft: https://support.microsoft.com/en-us/help/4023537/surface-surface-wont-turn-on-or-wake-from-sleep
Sometimes, a setting in the software's configuration files will get stuck, mismatched, or just confused! When this happens, you may see strange behavior in the RDI Suite of programs. One potential solution is to delete the configuration files by following the steps below:
1) Close all open RDI Applications
2) Open the Application which is displaying the error message. If multiple Applications are displaying an error, open each in turn and follow these same instructions for each Application
3) In the upper right-hand corner of the Application, click on the blue circle containing an "i"

4) The "RDI Information" window will appear

5) Click on the "Preference Factory Reset" icon shown in the green box below

6) Click "OK" to close the window.
7) Close the current Application and repeat as necessary.
8) Open any of the RDI programs normally. You may be prompted to set your Line Frequency or even measurement type and units again. This is normal and should only appear once.
If this does not correct your problems or if you cannot open the Application, please contact RDI Support by using the contact info on the support web page.
Some of the features that may be running in the background can require computer processing resources. Things like the Orbits and Waveform displays get redrawn in real-time as the video plays. If these background tasks are complex, they can slow down the video playback. Make sure that any background windows are closed if they are not essential to the work you are currently doing.
NOTE - You will lose any ROIs which are currently active if you close the Spectrum Window, but since it is not redrawn during playback, we recommended that you leave the Spectrum Window open.
NEW BEHAVIOR after update to Version 2.3
You no longer lose the ROI's location when closing all of the measurement windows.
Please contact RDI Technologies™ directly. If you can provide the "License ID" of your installation, it will help speed up the process. The location of the License ID is shown in the attachment. Our license server needs to be updated to allow the new computer. You will be issued a "Deactivation" for the existing computer and instructions on how to use it. Then, you can reactivate your Motion Amplification® program on another computer.
No you cannot. The system is highly optimized for the camera and lenses originally supplied with the Iris M™ system.
Renaming Folders, Assets, Collections or Recordings in Motion Explorer is very similar to renaming objects in Windows Explorer. You can either right-click on the item and select "Rename" from the pop-up menu or select the desired item and use the "Rename" ribbon icon from the top of the screen. This icon looks like this in both locations  .
.
See the attached video for examples.
Related Articles:
How do I rename RDI Data Files in the Motion Amplification® software?
The yellow portion of the image is that part of the recording which is still stored in memory and has not been written to the Solid State Disc Drive (SSD) of the Acquisition Device. The entire system, hardware and software, have been optimized to reduce this. However, as the SSD gets full, it becomes harder for the Acquisition Device to efficiently store your recording. Also, if several software programs are running in the background while you are recording video, the computer must multitask between these programs. Each of these slows the performance of your Acquisition Device.
To improve the performance of your computer you can:
As we get feedback from our customers, our Development Team implements new or improved features to improve your experience with Motion Amplification®. In these cases, the behavior may be slightly different between versions. In most cases, the original behavior is retained with the newer improved behaviors added. This means less change for existing users while offering improvements to everyone. In cases like this, to show both the new and original behavior, many of the early articles have been updated with a "NEW BEHAVIOR after update to Version X.X" section.
In some cases, multiple answers are available to solve the same question.
Please email your request to [email protected] and we will add you to the database. When refresher courses are available, you will be notified of the subject, location and date for all upcoming classes.
You may want to try the following steps if you are hearing “plin-plon” of USB connection/disconnection from the Surface Book.
If nothing changes you can shut down the software and restart the computer and after it restarts open the software and try again.
Your Iris M™ Acquisition System is delivered with a USB Memory Stick with an RDI Technologies™ logo. On that stick you will find the licenses issued with your system. The same files have been copied to the "Downloads" folder on the Acquisition System. They will typically be identified by your company name and may also include a contact name from your company. The file will be in a Text format. See the "Typical Files on USB Stick" figure below.
Typical Files on USB Stick:

After you open the text file, you will see that there are two licenses delivered with your Iris M Acquisition System. ("Typical License File" figure below.) The first, which is preinstalled in the system before delivery, is the "Full" or "Acquisition System" license which will activate the RDI Acquisition, Motion Amplification®, Motion Studio and Motion Explorer software. (For the difference between these see this article: RDI Technologies™ Acquisition Software vs. RDI Motion Amplification® Software vs. RDI Motion Explorer Software vs. RDI Motion Studio Software vs. Motion Monitor Software) This license is already active when you receive your system. You should see the four different icons associated with the RDI Acquisition, Motion Amplification®, Motion Studio and Motion Explorer software on your desktop when you first boot up the system.
Typical License File:

The second license will be identified as "SA" or Stand Alone or "Analysis Only". These three labels are all the same. This license is used to activate the Motion Amplification®, Motion Studio, and Motion Explorer software on a second analysis computer. When prompted, enter the license information into the license screen and select "Activate a license or renewal" as shown in the figure below.
License Activation Window:

Related articles:
On how many computers may I install the RDI Technologies™ Iris M™ software?
What are the minimum computer requirements for installation of the Stand Alone Analysis Software?
Two different installations are possible:
The Acquisition Device in the Iris M System will come preloaded and licensed with the RDI Acquisition, Motion Amplification®, Motion Studio and Motion Explorer Software.
There is a second Motion Amplification® license on the USB memory device shipped with your kit. You may install a second bundle of Motion Amplification®, Motion Studio and Motion Explorer programs on a separate computer.
Related articles:
What are the minimum computer requirements for installation of the Stand Alone Analysis Software?
What is the difference between the RDI Acquisition Software, the RDI Motion Amplification® Software, the RDI Motion Explorer Software, the RDI Motion Studio Software and the Motion Monitor Software?


These four software applications, used in conjunction with the video camera, make up the IRIS M™ System.

Processor: i7 is recommended, the newer generation of i7 processors is desirable and these are usually labeled 6th or 7th generation
Memory: 16GB of RAM minimum (32GB is highly recommended)
Hard Drive: SSD is not required, but will improve performance for stabilization, filtering, etc. If you do get a rotating HDD, we suggest using at least a 7200 RPM drive.
OS: 64-bit versions of Win 10 Pro or Win 11 Pro are the versions of Windows we have tested and support
On how many devices may I install the RDI Technologies™ Iris M™ software?
How do I update my Iris M™ software?
Please email your request to [email protected] and we will add you to the database. When new versions of the Iris M™ software are released, you will be notified by email.
Related Articles:
In order to increase Fmax, you must 'crop" the collected image. The best way is to decrease the vertical resolution (Height) of the image which allows you to increase the acquisition rate. Decreasing the Width of the recording will also allow you to increase Fmax, but at a slower rate.
See the video below for exactly how to do this and just what it means.
Related Articles:
What is the difference between a Region of Interest (ROI) and Zooming the View?
This behavior has changed several times since it was first introduced. In some cases, the original behavior was retained, in some cases, it has been improved and updated. Please see the instructions below for the specific versions.
Appearance and behavior in Version 2.0
![]()
In Version 2.0, the ROI icon will appear as shown above. To add multiple ROI's in your video you have to left-click, hold and drag the first box. It will be RED in color. To draw the second box, you had to press the Control [CTRL] key then left-click, hold and drag additional boxes. New boxes will be BLUE, GREEN, ORANGE, YELLOW, PINK, then RED with this sequence repeating. Between each ROI, you have to wait for the measurement calculations to complete before starting to position the next ROI.
Appearance and behavior in Version 2.1

In Version 2.1, the ROI Icons were changed to those shown above. In this version, a "Persist" mode was added.
When the Motion Amplification® software is set to "Standard Mode", your icon will look like this: ![]() . In this mode, you add multiple ROIs by following the same procedure as described above for Version 2.0.
. In this mode, you add multiple ROIs by following the same procedure as described above for Version 2.0.
When you click on the down arrow between the two icons, your icon will change to this: ![]() . To draw ROIs in this mode, you only need to left-click, hold and d
. To draw ROIs in this mode, you only need to left-click, hold and d
rag with your mouse. Every time you release, an ROI will appear. When you click another location, you will begin drawing a new ROI. Between each ROI, you have to wait for the measurement calculations to complete before starting to position the next ROI.
To switch between the two, simply click on the arrow to the right of the ROI icon,  . Choose the mode you would like to activate and click on the name to close the menu:

Appearance and behavior in Version 2.2

In Version 2.2, Standard Mode was changed to "Independent Mode" as shown above. The behavior is still as described in Version 2.0 above, only the name was changed. "Persist Mode" behaves as described in the Version 2.1 section above.
Appearance and behavior in Version 2.3 and Version 2.4
![]()
In Version 2.3, the ROI Icon has returned to the original design. However, the behavior is as described under "Persist Mode" in Version 2.1 above. Simply left-click, hold and drag to add ROIs to the video. You can still hold the CTRL, left-click and hold to draw multiple ROIs as well.
You can now click the "Cancel" button as the first measurements are calculated. Early measurements will be suspended until all of the ROIs are placed. Allow the measurements to calculate after placing your LAST ROI and all previously placed ROIs will have their measurements calculated at once saving you time.
For example, if you want to place four ROIs in your video, you can left-click, hold and drag to place the first ROI. As the measurement dialog appears, click "Cancel" and place the second and third ROIs in this same manner. When you place the fourth ROI, allow the measurements to calculate and all four will be presented when done.
Appearance and behavior in Version 2.5

In Version 2.5, the order of the two ROI icons is reversed. Delete is on the left and the Type of ROI selection is on the right. In this mode, you place ROIs by left-clicking, hold and drag in the area where you want to ROI. You can place multiple ROIs by continuing this process everywhere you want an ROI. You can suspend the measurement calculations and complete them with the last ROI placed.

In this version, you have two new ROI types, the “Horizontal Shaft” and the “Vertical Shaft” measurement tools. As the icons indicate, you will be able to measure shaft movement on a shaft which is recorded horizontally using the Horizontal Shaft tool. Shafts recorded in a vertical orientation are measured using the Vertical Shaft tool.
Appearance and behavior in Version 3.0

The ROI Icons appearance is unchanged in Version 3.0, but there is a new “Transient” ROI tool.

This type of ROI will track translational movement and show you the path of such motion.
PURPLE was introduced as a 7th color in the sequence in this version. Now the color cycle, RED, BLUE, GREEN, ORANGE, YELLOW, PINK, PURPLE, RED, will repeat.
Related Articles:
What is an ROI in Motion Amplification® lingo?
The only way to raise the frequency resolution is to increase the time of the recording. Frequency resolution can be expressed as 1/t where t = recording time. For example, a recording time of 1 second will allow you to resolve to 1Hz, at 10 seconds you can resolve to 0.1 Hz, at 20 seconds you can resolve to 0.05 Hz.
Related Articles:
There are several prerequisite software packages installed with the Iris M™ software. Some configure the camera, some the video display. In some cases, your virus protection software may identify these prerequisites as potentially harmful and block their installation. You may have actually seen various pop-up warning messages during the initial installation. In order to make sure that the program gets installed as intended, we recommend that you disable all virus protection software during the software installation process. You can re-enable it after the installation has completed and the Iris M software will function normally.
Sometimes, if you install from the internet, or from within the ZIP file you downloaded, you may have troubles. You may also want to try reinstalling the software.
Related Articles:
Check things in this order:
Related Articles:
Behavior in Version 2.3 and earlier:
Lighting is the biggest challenge when recording inside. Because indoor lighting is typically powered by Alternating Current (AC) the fluctuations in light intensity can be seen when using Motion Amplification®. One of the symptoms is found in the article: My recording flashes bright and dim during analysis when I move the Motion Amplification® slider. The Iris M™ System contains helpful tools to automate selecting compatible recording rates. Using the selections from the "Acquisition Mode," "Lighting," "Framerate (fps)" and "Fmax (Hz)" boxes under the "Camera Properties" section of the RDI Technologies™ Acquisition software will configure your recording for compatible frame rates giving you the best quality videos at all Motion Amplification® settings.
Be aware, we have even seen flash rates at frequencies "around" line frequency. So, your filters may have to be adjusted slightly to eliminate the actual frequency.
NEW BEHAVIOR after update to Version 2.4
To simplify the recording process, the Acquisition Mode and Lighting settings have been removed from the user interface. Now, all that is required is to slide the "Framerate (fps)" slider to the needed setting.
See the attached videos for locating and using these controls.
Related Articles:
What are some of the challenges when recording outdoors?
My recording flashes bright and dim during analysis when I move the Motion Amplification® slider.
During installation, the software contacts the RDI Technologies™ server and validates that installation on that computer.
This is true for both the Acquisition System and the Analysis Only installation on a second computer.
Related Articles:
The Gain slider adjusts the sensitivity of the camera’s sensor. Use it sparingly. By increasing the gain, you will brighten your image, but you will introduce more noise and decrease the quality of the measurement. Sometimes this is necessary when the image is too dark. This value is scaled from 0 to 30.0. Always set the Brightness slider first, then add the least gain necessary. You may also want to add supplemental lighting to reduce the need for excess gain. There are three ways to move the slider:
In the attached video the three adjustment methods are displayed. You can also see the effect that moving the slider has on the image.
NEW BEHAVIOR after update to Version 2.5
The Gain slider plays an important part in Shaft Inspection recordings. Here, you want to set the Gain slider as HIGH as possible and the Brightness slider as LOW as possible. This allows for the shortest exposure time and clearest picture of a rotating shaft.
Related Articles:
When using RDI Technologies™ Acquisition Software, if you left-click and drag the cursor on the screen, you will draw a red box. This box becomes the "Region of Interest". The image will be cropped to include ONLY the video inside of this box. All surrounding images are ignored. You can use this to reduce the amount of data recorded and stored by the camera. This becomes useful as you try to record at higher Frames per Second or Fmax values.
Using the ZOOM icons simply allows the user to focus on a smaller portion of the video being recorded. This is useful for improving the focus of the image. The difference in this case, is that the image surrounding the current view is still recorded.
See below for examples (assume the asset in these pictures is always the same size):

The ZOOM icons in the RDI Acquisition or Motion Amplification® software:

Related Articles:
There is no specific maximum length of recording. It will depend on the available free Hard Disc space on the Acquisition Device. Keep in mind that processing time increases at a faster rate than recording time.
Related Articles:
In order to save and replay Raw Video files from another location, all of the original files must be transferred and stored in the same location. There will be a file folder and individual file which both have the same name. The individual file will end in ".RDI" and is recognized by the Motion Amplification® software as a known file type. Clicking it will launch the Motion Amplification® software and load the video.
To extract files from a Compressed (Zipped) Folder follow these steps:
Please see the attached video for a demonstration of the extraction process.
Related Articles:
How do I send Raw Video to a user who has RDI Motion Amplification Software for Analysis?
The Brightness slider adjusts the brightness of the image by changing the exposure time of the image. The larger the brightness level the longer the exposure time. This value is scaled from 0 to 100 percent. There are three ways to move the slider:
In the attached video the three adjustment methods are displayed. You can also see the effect that moving the slider has on the image.
NEW BEHAVIOR after update to Version 2.5
The Brightness slider plays an important part in Shaft Inspection recordings. Here, you want to set the Brightness slider as LOW as possible and the Gain slider as HIGH as possible. This allows for the shortest exposure time and clearest picture of a rotating shaft.
Related Articles:
Accurate entries for Distance to target and Focal Length are REQUIRED for accurate displacement measurements. Displacement calculations depend on these entries with an error equivalent to the error in the measurements. The closer you are to an object, the more critical the accuracy of the entries becomes because the error has a larger impact. For example, a 1 inch (25 mm) error at 12 inches (305 mm) is a larger percentage (8%) than a 1 inch (25 mm) error at 100 inches (2540 mm) (1%).
Related Articles:
One of the biggest challenges when recording outdoors is lighting. Outside, you have access to a huge DC light source, the sun, so you would think you would have ample light. But, the sun may not always be where you want it or unblocked. On days when the sky has a scattered cloud layer, you may find yourself drifting in and out of good lighting. We had one instance where for the final shot of the day, a cloud suddenly appeared and made the shot unusable. The only solution in this case was to rerecord the video!
Even when you are outside, you may find that you need to add external lighting. Typically, overcast or mostly cloudy days will provide the most consistent even lighting.
NEW BEHAVIOR after update to Version 2.5
 The "Saturation Tool" (icon above as found in the Acquisition software) may also give you some insights on how much the lighting is changing in a particular scene. As the lighting changes, the saturation tool will change in real time showing you changes in the lighting patterns.
See the attached video for a sample of what you may see using the saturation tool.
Related articles:
What are some of the challenges when recording indoors?
My recording flashes bright and dim during analysis when I move the Motion Amplification slider.
For Video Acquisition - Because you need the USB ports, using the Surface Book as a tablet takes a little creativity. But, if you detach the tablet from the keyboard, turn it around, reattach it, and close it up - this is a little awkward because of the extra protective case - you can use the stylus and onscreen keyboard to acquire data.
For Motion Amplification® - You can detach the tablet and use the Motion Amplification® software. Here again, use the stylus and onscreen keyboard as necessary.
Microsoft Surface Book 2 Update (released about Nov 2017)
The stylus is no longer standard with the Surface Book 2 according to Microsoft.
By using Microsoft Word or similar programs, you can cut and paste the Time Waveform and/or Spectrum Plots for viewing. You can also place your large video files on a server and insert hyperlinks into your document to keep from having to email large video files.
NEW BEHAVIOR after update to Version 2.1
In this version, there are two new menu items in the Waveform Plots window which easily allow you to save the plot as an image.


NEW BEHAVIOR after update to Version 2.3
Now, the majority of your reporting needs can be filled by using Motion Studio. Motion Studio brings paper reports to life by including everything in a single video. You can still use these techniques, but instead of adding it to a paper report, you will be using the images in a video presentation.
Related Articles:
Please see the attached document for the RDI warranty statement and a list of warranty periods for the hardware in the Iris M Basic and Accessory packages.
Please contact RDI Technologies™ directly to file a warranty claim using the contact information found here: RDI Technologies™ Support
In general, you should select the distance and lens combination that allows you to fill the full frame with the entire asset, including the base. It may also be beneficial to include some background objects such as piping or structures. Specifically, it will depend on several things:
Below are examples using five different focal length lenses on the same camera all positioned 5.5 feet (1.7 m) from the object. As you can see, each lens halves the field of view or doubles the zoom.
6mm lens

12 mm lens

25 mm lens

50 mm lens

100 mm lens

Related articles:
The aperture ring is a collar on the camera that can be rotated to increase or decrease the aperture. The effect is letting more or less light in, respectively. The convenient part about aperture settings is that the amount of light taken into the camera at a particular setting will be equal across different lenses. If you find a good setting for your configuration and decide you need to change lenses, you can use the same f-stop with the new lens.
Examples of the Aperture Ring location on a lens.

Different aperture settings

Related Articles:
What is the Gain slider for and how do I use it?
What is the Brightness slider for and how do I use it?
Yes. While viewing either a Time Waveform or Spectrum display, right click in the plot area. From the new pop-up menu, select "Setup Options". The new window contains drop-down selections which allow you to individually select how you want your plots to display.
See the attached video for a demonstration.
You will find this selection behind the "Application Settings" gear in the upper right-hand corner of the Motion Amplification® software. Simply open the dialog window and make your selection. All of the associated plots will be changed when you save the new settings.
The attached video shows you how.
You will find this selection behind the "Application Settings" gear in the upper right-hand corner of the Motion Amplification® software. Simply open the dialog window and make your selection. Because the amplitude units can depend on the frequency, the associated plots will not be redrawn until they are reactivated.
The attached video shows you how.
The first ROI that was drawn will be the one that pre-populates the Filter Specification window.
Do I need to do anything special to use my New Feature for the first time?
There are several “Add-On” features to purchase with your Iris M System. These can include, but are not limited to, the Iris MX, High Speed Plugin, Iris M Tachometer, and Iris M Color Camera. The process below will be similar for all Newly Licensed Features. Simply confirm the status of the Feature in the list when verifying the software is active.
Please follow the steps below to refresh your license.
Refresh Your License:
With some features, if you have already connected the device to the computer, you may receive an error message similar to the one shown below.
Click OK to close the window and continue following these instructions.

Connect the computer to the internet.
Open Motion Explorer and click the blue ![]() in the top right corner. The “RDI Information” window will pop-up. Click on the ‘Details’ button to display the status of any additional licenses.
in the top right corner. The “RDI Information” window will pop-up. Click on the ‘Details’ button to display the status of any additional licenses.

The License Details window will appear. Note the condition of the New Feature. An active feature will be labeled “True” an inactive one will be labeled “False.” Click the “OK” button to close the License Details window.

Then, click the icon to the left of “Manage License.” Shown in a green box below.

Next, the “Multiple License Management” screen will appear. For all additional licenses except the Iris CM™, click the top “Motion Amplification® License” bubble and then click “OK.”
For the Iris CM, you should first try the Stand Alone Motion Monitor License bottom button. If there is an error, use the top bubble. It is most common to purchase Motion Monitor as a separate feature. If you are unable to determine which type of license you own, please contact [email protected].

You will now have three actions available to you, please click “Refresh my license,” then click “Next”.

After clicking next, you should receive a pop up that looks like the picture below. Click “Finish” to complete the request.

Close any open RDI Programs, connect the camera, and open RDI Motion Explorer ![]() or RDI Acquisition.
or RDI Acquisition. 
Open Motion Explorer and click the blue ![]() in the top right corner. The “RDI Information” window will pop-up. Click on the ‘Details’ button to display the status of any additional licenses.
in the top right corner. The “RDI Information” window will pop-up. Click on the ‘Details’ button to display the status of any additional licenses.

The License Details window will appear. Note the condition of the desired new feature(s) line. Click the “OK” button to close the License Details window.
NOTE – Only options purchased through RDI Technologies will appear as “True.” If you wish to find out more about additional options, please contact RDI Technologies.

Click “OK” again to close the RDI Information window.
The software is now ready to use and will recognize devices connected to the Acquisition Device. The software may display additional fields as necessary for compatibility with the new feature.
20210421A
Related Articles:
Connect the bayonet connector of the supplied Tach Cable* to the bottom output connector on the right side of the Laser Tach:

Then, connect the 8-pin end to the GPIO port on the back of the Iris Camera. This connection is the same for both Monochrome and Color cameras.

Turn the Tach on by pressing the large center power button. The display will become active. Press and hold the large Power/Activate Tach button. The "Laser Active" icon will become visible in the display. While holding, press the Menu/Lock button. The lock icon should appear in the display. The laser is now locked on for use.

In the software, you will want to set your Brightness down as low as possible to obtain a clearer image. This type of recording will benefit from a large amount of supplemental lighting.
------------------------------------------------------------------------------------------------------------------------------------------
*The hardware for this option is provided by RDI Technologies in the following Kits:
1) Flir/Basler Laser Tach Kit Includes:
2) Flir/Basler Laser Tach Interface Cable Kit includes:
3) Flir/Basler Universal Laser Tach Interface Cable Kit includes:
1. Make sure that you have the latest Server Software by logging into the RDI Technologies™ website and downloading the latest version here: Software Updates
NOTE - For the best performance, please don't forget to update all your Iris software simultaneously. The Iris M software can be found here: How do I update or install the software for my Iris M™, Iris MX™, or Iris CM™ System?
2. Download and save the Camera Firmware by going here: Iris Camera Firmware Download
3. On the Iris CM server, search for and open SpinView
NOTE - To connect to the server, you can either use a keyboard, mouse and monitor or use Remote Desktop to access the system.

4. You will see the following screen
NOTE - In the step below, if your camera Model Name is listed as anything different than "Grasshopper3 GS3-U3-23S6M" please contact RDI for further instructions. The firmware in this article is only compatible with that Model.
6. Single click on the camera serial number, highlighting it blue, and this button at the top will activate:
Click it to open the 'Firmware Update' dialog box:
7. Click 'Browse' and navigate to the location where you saved the file named "gs3-u3-imx174_gs3-u3-23s6-2.35.3-00.ez2" in the steps above and click open, then start.
8. You will receive the message shown below, click "Yes"
8. After a few moments, you will receive a message that the camera has been updated successfully and is waiting to reboot. A timer will count down from 15 seconds to reboot the camera.
Please see the attached document for the RDI warranty statement and a list of warranty periods for the hardware in the Iris M Basic and Accessory packages.
Please contact RDI Technologies™ directly to file a warranty claim using the contact information found here: RDI Technologies™ Support
Difference between the type of amplification applied, Transient or Standard.
Transient is very quick and useful for removing the "motion ghosting" related to items moving around the scene.
Standard will add some processing time to opening the video when first opened. Subsequent openings will retain the original processing in the background.
New in V3.0.
Amplified didn't seem to exist in 3.0 or 3.1??
Related articles:
Turn Transient Amplification On/Off
Change default amplification mode
See also Batch Amplifying
When introduced in Version 3.0, the Motion Vector arrows had to have both an X and Y component in the associated ROI Measurement. This is what a Vector Arrow looks like when placed in a location that has both X and Y measurements:

If Motion Amplification® could not determine the motion in one direction, you would receive an error message similar to this and the Vector Arrow will not display:

Shape of ROI when either X and/or Y cannot be determined:

In this case, you would have to move the ROI to a location which has contrast in both X and Y directions. If it is not possible to get X and Y contrast, the Vector Arrow cannot be displayed.
NEW BEHAVIOR after update to Version 3.5
Introduced in Version 3.5, you can now select a single axis for displaying the Motion Vector. This is true for ROIs containing both X and Y components or for ROIs which only contain one component. Click the arrow to the right of the Motion Vector icon to display the Motion Vector Options window. In the "Orientation" window, select the type of motion you want to display, X & Y, X, or Y. The Vector Arrow will respond accordingly.
The tiny green box to the right of the Motion Vector icon reveals the Options menu. In the menu, you now have access to the "Orientation" selection box to show single axis motion.

Related Articles:
How do I add the Motion Vector arrows to my ROIs?
Version 3.0 introduced multiple-user licensing to the Iris M™ Motion Amplification® software suite. Now, each user logged into an account on the PC will be able to run the Motion Amplification® software. This is true on both the Acquisition Device that was delivered with the system and the Analysis Only installation installed on a separate computer.
Keep in mind that by default, each user will store recordings in their own DocumentsRDIRecordings folder.
Related Articles:
Where can I find the details of my software licenses?
How many computers may I install the RDI Technologies™ Iris M™ software on?
You can absolutely add the Motion Map to recordings taken with older versions of Motion Amplification®!
Yes!
Introduced in Version 3.0, "Transient Analysis" allows you to place ROIs in an image to track linear motion.
The new Transient ROI Icon:

Sitting at home during quarantine with a camera and only a 6mm lens, I happened to capture a video of a bird in flight. What amazes me is the limited information that the software needs to capture and track this object! Granted, not the best of recordings, but it pushes the limits of what the software can actually do. Yes, it's that spec in the upper right-hand window pane!
Related Articles:
Introduced in Version 3.0, the Motion Map is a tool that uses color to draw attention to where motion is present. It is an overlay on the recording which you can control for both transparency and intensity.
This color overlay will be referred to as a “Motion Contour”. The motion contour indicates the amount of relative motion present at any given pixel. This is not a calibrated or absolute measure of motion, so ROIs should be used if accurate displacement values are desired. In multi-color mode, red indicates the most motion and blue indicates the least motion. In single color mode, pixels in red indicate the most motion.
The Motion Map is accessed by clicking on the following icon from the toolbar:

The video attached below gives a brief demonstration of the Motion Map.
Related Articles:
First, there must be an ROI in the current recording. When one is present, the "Show Motion Vectors" icon will become available. You can click on this icon to add the display to your ROI(s):

The vectors have attributes which you can control by clicking on the drop-down arrow to the right of the icon. Generally, the vector display is controlled as a "group." You will see this menu:

Link to video showing how to add the Motion Vector arrows to your recording.
Related Articles:
When I try to display a Motion Vector, I receive an error. What's wrong?
Yes!
Introduced in Version 3.0, you can now amplify recordings live. In the RDI Technologies™ Acquisition software, click on the "Enable Motion Amplification®" toolbar icon. You will see the Motion Amplification® slider and Playback Speed slider appear. You are now amplifying the live feed from the camera!
This mode takes a lot of computing power and depending on your slider settings, you will actually begin to "go back in time." By clicking the "Return to Live" icon to the right of the Enable Motion Amplification® icon, you will return to the live feed.
Click the icon highlighted in the green box to begin Live Motion Amplification®:

You will know that you are in Live mode by the appearance of the "Motion Amplification®" and "Playback Speed" sliders:

The "Return to Live" icon: 
New in Version 3.0 is the ability to hide the ROI boxes. This applies to all ROI types, Standard, Horizontal Shaft, Vertical Shaft and Transient.
To hide the ROI box:
To unhide the ROI box:
See the video below for a quick demonstration.
Version 2.5 is the first version of RDI Technologies™ software where rotating shafts can be measured. However, you must use one of the specific Shaft Measurement ROI's, Horizontal Shaft or Vertical Shaft. A standard XY ROI cannot make this measurement.
Related Articles:
Can a recording taken in a previous version of software be used to take a Shaft Measurement?
Possibly.
If you have an old recording which has a good view of a shaft, you can open it in Version 2.5 or newer of Motion Explorer and add one of the Shaft Measurement ROI boxes (Horizontal Shaft or Vertical Shaft) to the shaft location. Keep in mind, the shaft must be large enough, have good lighting, and be either horizontal or vertical. If you only have a small portion of shaft in the background, it may not provide good measurements.
NEW BEHAVIOR after update to Version 2.5
Use the "Export Specification" tool to change the quality and content of your MP4 exports.
New in Version 2.5 is a tool that you can use to determine the quality of the MP4 created during export. You have three choices: Low, Medium and High. High will produce the highest quality video and the largest file size. Low will result in the smallest file size and the lowest quality video. This selection determines the level of compression that is used when producing the video.
This tool also lets you determine the Video Format for the MP4. Available choices are:
Full HD (High Definition) 1920x1080
HD (High Definition) 1280x720
SD (Standard Definition) 640x480
The larger the format, the larger the size of the produced file.
The table below gives approximate file sizes for a 1 second video in each format at each quality.
| Full HD | HD | SD | |
| High | 277 KB | 144 KB | 30 KB |
| Medium | 277 KB | 144 KB | 30 KB |
| Low | 215 KB | 141 KB | 30 KB |
The Export Specification tool looks like this (with the Video Format and Quality lines in the green box) and will appear after clicking on the "Export Video" icon 

Related Articles:
Why do some questions have multiple answers?
How can I reduce the size of an MP4 export? (Export length)
How can I reduce the size of an MP4 export? (Playback speed)
How can I reduce the size of an MP4 export? (Original and Amplified Frames)
Yes.
New in Version 2.5 is the ability to compare waveform peaks and find a relative phase difference between the waveforms.
To compare phase readings follow these steps:
1) Place two ROIs in the recording and let the software perform its calculations
2) (Optional) You can use the Spectrum to identify the peak frequency. If you know the frequency, this is not necessary.
3) Open the Time Waveform displays
4) Right-click in the plot that you would like to use as the Master for the reference
5) From the new pop-up menu, select "Set Phase Reference"
6) Enter the frequency at which you want to do the comparison
7) You will see the frequency appear at the bottom of the Master waveform
8) The other waveform displays will have a relative phase between their waveform and the master's
The video below gives a short demonstration comparing the relative phase between two ROIs in the X-axis
Yes you can.
Starting in Version 2.5, in Motion Explorer, you can select multiple recordings to amplify all at once.
On your tree-view list inside a collection, you will see the videos listed. Any video with a green check has been amplified. Any video with a yellow caution symbol needs to be amplified.
From within a collection, use the "SHIFT+Click" or "CTRL+Click" to select multiple recordings. After the necessary recordings are selected, click on the "Amplify Recording" icon from the ribbon bar. Note - the icon will also only appear active when a recording which needs to be amplified is selected.
 The attached recording gives a short demonstration of this behavior.
Yes!
New to Version 2.5 is the "Trim Recording" tool represented by this toolbar icon:

To use this tool:
See the attached video for a quick demonstration
Possibly.
If you purchased your Iris MX at the same time as the complete Iris M™ system, these steps were done before the system shipped. If you purchased the Iris MX later, there are a few settings that need to be confirmed on your computer.
The first is that your license supports the Iris MX, second is that “Jumbo Packets” are enabled, and third is that the connection can pass through the firewall.
Please follow the steps below to confirm, and change as necessary, these settings.
Refresh Your License:
If you have already connected your camera to the computer with the ethernet cable and adapter, you may receive the error message shown below.
Click OK to close the window and continue following these instructions.

Insure you have a connection to the internet.


Open Motion Explorer and click the blue in the top right corner. The “RDI Information” window will pop-up, click the icon to the left of “Manage License.”

From the Multiple License Management window, select the “Motion Amplification License” bubble and click OK.
NOTE- “Stand Alone Motion Monitor License” should only be selected for use in conjunction with the Iris CM.

You will now have three actions available to you, please click “Refresh my license,” then click “Next”.

After clicking next, you should briefly see a “Processing” pop up that looks like the picture below.

After the license is processed, you should see the “Request Completed” screen shown below. Click “Finish” to complete the request.

Close the RDI Information window by clicking “OK.”

Verify that the Iris MX™ software is active by following these steps.
Close Motion Explorer, connect the camera, and open RDI Acquisition using this icon  . You should see these indicators that the software has detected an Iris MX camera.
You should see a red power button in the upper right-hand corner of the window.

Under “Camera Properties”, the framerate should show 120 fps and be about midway on the slider.

The “Image Properties” should show the Width and Height settings shown below.

You can also click the blue  in the top right corner. The “RDI Information” window will pop-up, click the icon to the left of “Manage License.”
Click OK to close the window.
Enable Jumbo Packets/Frames:
If you have already connected your camera to the computer with the Ethernet cable and adapter, you may receive the error message shown below. Click OK to close the window and continue following these instructions.

Make sure that the Ethernet adapter is plugged into one of the USB ports on the computer.
Type “network” into the Cortana Search Bar on the bottom left-hand corner of the Taskbar

From the list, double-click on the “Network status” setting the “Network Status” window will appear. Click on the “Change adapter options” link from the middle of the page.

Right-click on the “Ethernet X” connection and select “Properties” from the new pop-up menu. Each Ethernet adapter will be assigned a number. Determine the specific number of the adapter that correlates to the one used with your Iris MX™ camera.

In the Ethernet X Properties window, while the “Client for Microsoft Networks” line is highlighted, click on the “Configure” button.

In the “Realtek USB GbE Family Controller Properties” window, click on the “Advanced” tab. From the left hand “Property” list, select “Jumbo Frame.” If the “Value” field on the right says anything but “9KB MTU” use the drop-down list to select “9KB MTU” and then click the “OK” button to save the changes close the window.

Depending on your version of Windows, the above screen may show the selections below. Select the 9014 Bytes line as shown below.

Close any remaining windows and continue as below.
Firewall Settings:
In the Cortana Search window in the bottom left-hand corner of the Taskbar, type “firewall”

Select “Check firewall status” from the list of items displayed and the “Windows Defender Firewall” window will appear. In the list on the left, select “Advanced Settings” to display the “Windows Defender Firewall with Advanced Security” window.

In the left-hand column, select “Inbound Rules” to display a new list.

Scroll down until you see “RDI_Acquisition”
NOTE – This list is alphabetical but with two different groupings. The RDI_Acquisition will typically appear in the top group but check both as needed.
Double-click on the top RDI_Acquisition line in the list to display the “RDI_Acquisition Properties” window.

When you see this window click the “Advanced” tab.

On the “Advanced” tab, make sure that all three of the top “Profiles” boxes are checked.

Click OK to close this window and repeat for the second listing of “RDI_Acquisition”
When you are finished, the entries should look like those shown below. Each entry in the list for “RDI_Acquisition” should say “Profile – All” and “Enabled – Yes”.

Close any open windows. Your computer is ready to use with the new Iris MX™ camera.
These instructions are duplicated in the attachment which is downloadable.
Related Articles:
Successful and efficient downloads from the MX camera require the full capacity of the network hardware on the acquisition computer. It is strongly recommended that both Wi-Fi and Hotspot network detection be disabled during acquisition. (By the way, this will also help the battery last longer.)
If your data transfer is extremely slow or you receive errors like:
Excessive download error. Transfer is beings significantly slowed due to data errors. Do you want to continue?
An unrecoverable download failure has occurred. Please contact RDI customer support.
These are signs that the ethernet connection is being used by multiple processes.
To correct this, follow these instructions:


You should also consider disabling or white-listing the RDI Acquisition application in any firewall settings.
The attached video shows these steps.
Related Articles:
Do I need to do anything special to use my Iris MX™ camera for the first time?
Please see the attached document for the RDI warranty statement and a list of warranty periods for the hardware in the Iris MX package.
Please contact RDI Technologies™ directly to file a warranty claim using the contact information found here: RDI Technologies™ Support
We realized that there was a need to create more elaborate MP4 video reports so, we introduced Motion Studio in Version 2.3. Now, you can add Title Pages, Annotations, Create Composite Collections of Videos, and do it all in a single MP4.
Please see the video at this link for a sample of some of the capabilities of Motion Studio.
When you use the "Move" function of Motion Explorer, all of your files are transferred from one storage drive to another. The original files are transferred to the destination and no longer reside in their original location. The description in Motion Explorer is updated with the drive letter and path of the new location.
When you use the "Export" function of Motion Explorer, all of your files are bundled into an "Export" file and an associated folder. You have the choice of deleting the raw data on the original computer or keeping both copies, the original and the exported version. If you choose to Keep the raw data, the Location shown in Motion Explorer will be the original path, not the exported path. If you choose to Delete the raw data, the entire file(s) will be deleted from the computer and inside of Motion Explorer. When you "Import" a previous export, the data will be placed back in the original Hierarchy as defined at the time of the Export.
The table below explains some of the differences between the results of a Move and an Export/Import:
| Move | Export | ||
| How does the free Space change on my AD | All data is moved to external drive | Delete on export will free space on AD | Without Delete - Copies exist on AD & external Drive/another computer |
| What can I Access from my AD | Original recordings as shown in the ME tree * | If saved, duplicate hierarchy tree and duplicate data | If deleted, no hierarchy exists any longer on AD |
| How many Steps to make the transfer | 1 - External Drive path will be shown in ME ** | 2 - Export from AD Import to Analysis Only | |
| How does my Hierarchy look / How to keep things Organized | Location changed to "D:" */** | Remains the same after import | |
| What level of my Hierarchy tree can I move | Minimum is by Collection | Pick and choose recordings | |
| What can I see at the destination | AD- original hierarchy retained ** | Original hierarchy following an import | |
| Possible use cases | Free up space on AD 'Archive' with 'access'* | Archive, Completely move to Analysis Computer | |
| Acquisition Device = "AD" | * - Access speed/capabilities depend on the speed of the external drive and connection. | ||
| Motion Explorer = "ME" | ** Files need to be manually added to appear in a Hierarchy of Analysis Installation | ||
Related Articles:
How do I "Move" files using Motion Explorer?
How do I "Export" then "Import" files using Motion Explorer?
First, you must Export raw data from Motion Explorer. Do this by:
1) Select the level in the hierarchy listing that you want to export. You can change this selection in Step 5 below before exporting.
2) Either select the "Export" icon from the ribbon or right-click and select the "Export" icon from the new pop-up menu
3) Make the desired selections in the "Export Specification" window
4) Select "Next"
5) Confirm or change your selections with respect to the Folders, Assets, or Collections that you want to export
6) Select "Finish" to begin the export
After you have exported the desired files, move them to a new computer. Then, to import them follow these steps:
1) Select the highest level in the hierarchy, by default this was named "Company Name" but may have been customized at some point. It will have a "Factory" icon, like this one
2) Either select the "Import" icon from the ribbon or right-click and select the "Import" icon from the new pop-up menu
3) Use the "Select the export file of interest" window to navigate to the exported data. This file will have a ".EXP" file extension. Select the desired file
4) Click "Open" to complete the operation
Please download and view this example: Sample Export/Import Video
See also:
What is the difference between "Move" and "Import/Export" when using Motion Explorer?
To move data:
1) Select any level of the hierarchy tree
2) Either use the "Move Files" icon from the ribbon or right-click and select "Move Files" from the new pop-up menu
3) When the "Destination Directory for File Move" window appears, use the "Browse" icon 
4) Click the "OK" button and the move will begin
NOTE - Make sure that there is enough room in the destination location to prevent any potential errors or data loss
See the attached video for a sample of the Move operation.
Related Articles:
What is the difference between "Move" and "Import/Export" when using Motion Explorer?
How do I "Export" then "Import" files using Motion Explorer?
Your existing data (typically saved on the Acquisition Device before the introduction of Motion Explorer) can be added to a Hierarchy structure of your design by following these steps:
1) Create the directory structure you want using the "New Folder", "New Asset", and "New Collection" icons from either the ribbon or the right-click pop-up menu
2) Navigate down to the "New Collection" level and click the "Add File" or "Add Recording" icons from the ribbon or right-click pop-up menu
NOTE - Add File will add ANY file type to the hierarchy tree
Add Recording will only add .RDI video recordings to the hierarchy tree
If you are uncertain, it is safest to use the "Add File" option
3) After clicking Add File or Add Recording, the "Open" window will appear. Use this window to navigate to the location where your raw data is currently stored
4) Select as many files as necessary, keeping in mind that they are being stored in one specific collection, then click the "Open" button to begin the import. Selecting multiple files can be accomplished by:
a) Hold CTRL+Click to select files in any order
b) Hold SHIFT+Click to select consecutive files
5) Repeat this process for any and all collections as necessary
See the attached recording for an example of how to add files/recordings.
Yes.
If you have several recordings which share the need to have common filters applied, Motion Explorer will allow you to apply an existing filter or filters to multiple recordings.
To copy filters from one recording to the other, follow these steps:
1) Select the recording which contains the desired filter(s) from the Motion Explorer tree view
2) Click on the "Copy Filters" icon in the ribbon

3) Select another recording or multiple recordings (by using the SHIFT+Click or CTRL+Click selection methods)
4) The "Apply Filters" icon in the ribbon will become active

5) Click the "Apply Filters" icon
6) A dialog will appear showing you the filters which are found in the first recording. If you want to apply all of the exact same filters, you can simply click "Apply" and allow the software to complete the process.
7) If you do not want to apply all of the filters, you can select only the filters which you do want to apply by changing the status of their check boxes.
8) If you accidentally included a recording, you can deselect it by removing the check from the box in front of its name. The filter will not be applied to unchecked recordings.
9) You can also change the default file name by clicking in the "File Name" window before clicking "Filtered Recording Name".
See the attached recording for a short demonstration.
Introduced in Version 2.2, you can choose to "Amplify Later." Should you want to work in the recording by adding annotations, adjusting the contrast, or something else which does not require the use of Motion Amplification®, you can press the "Amplify Later" button which will appear when you first open a recording. You can then either amplify them by moving the Motion Amplification® slider or using Motion Explorer's "Amplify Recording" feature, see the related article listed below.

Related Articles:
There are two green triangle shaped sliders on the waveform. When you click and hold on the slider, you can move it through the waveform. Move these sliders from either end to limit the amount of the waveform that gets FFT applied. As you move the sliders and reduce the number of samples, you can see the reduction in the clarity of the spectrum.
See the attached video for a short demonstration.
Related Articles:
The harmonic cursor settings are available from a pop-up menu in the spectrum window. This cursor also has the ability to move between the lines of resolution. Do this by pressing and holding the SHIFT key while you press the arrows. This behavior is also explained on this pop-up window:

1) Right-click inside of a spectral plot
2) Select "Setup Options"
3) From the center of the new window, check the box for "Harmonic Cursor for Spectrum Plots"
4) Enter a value for the "Number of harmonics to display
5) Click "OK" to close the window
6) Return to the spectrum and move the cursor with either the Arrow keys or the SHIFT+Arrow keys
See the attached video for a short demonstration
Reduce the length of the exported recording
This method is available in all Versions 2.0 and newer.
In some cases, where the motion is repetitive in nature, it may not be necessary or possible to export the entire video. To reduce the size of a Motion Amplification® recording which has already been analyzed, you can select the amount of the recording you want to export. Follow these steps to select the amount of the recording to export:
found to the right of the Playback Bar
NEW BEHAVIOR after update to Version 2.5
The method for adjusting the Export Start and End positions was improved in Version 2.5. From that version on, you can simply click, hold and drag on the green triangles and move their positions.

Adjust the green triangles as necessary until you achieve the size MP4 you desire.
Watch the attached video for an example.
Related articles:
Why do some questions have multiple answers?
Can I amplify only a portion of the exported MP4 video?
How can I reduce the size of an MP4 export? (Playback speed)
How can I reduce the size of an MP4 export? (Video Format and Quality)
How can I reduce the size of an MP4 export? (Original and Amplified Frames)
Behavior in Versions 2.3 and earlier:
When you record a video the "Lighting" selection will optimize the recording settings to reduce the flicker found in lighting supplied by Alternating Current (AC). This flicker will be at 50 or 60 Hz depending on your local electrical line frequency. Normally, the recording will be made at twice this line frequency. If the frame rate is set at a frequency other than twice the line frequency a beating (beat frequency) between the frame rate and lighting may occur. If you have selected "Other" as your Lighting selection then manually adjusted the frame rate so that it is no longer twice the line frequency, as you amplify the recording, the flickering will change the intensity of the lighting on the asset making it appear brighter and dimmer. To reduce this affect, you can either:
The Camera Properties window in Version 2.3 and earlier:

NEW BEHAVIOR after update to Version 2.4
To simplify the recording process, the Acquisition Mode and Lighting settings have been removed from the user interface. Now, all that is required is to slide the "Framerate (fps)" slider to the needed setting.
The Camera Properties window in Version 2.4 and newer:

Related Articles:
Yes. You can export the Time Waveform as a CSV (comma-separated values) file for additional analysis. Simply open the Time Waveform display from an ROI and right-click in the plot area. Select "Export" or "Export Waveform Data" from the new pop-up menu. The export will be stored in the same location with all of your recordings and videos. It will be in the "RDI" folder in a directory named "Export".
Versions 2.1 and earlier: Versions 2.2 and newer:

The annotation features inside the Motion Amplification® software allow you to embed text messages in the final exported MP4. You can use these features to document amplitude measurements.
NEW BEHAVIOR after update to Version 2.3
Use Motion Amplification® to add dynamic graphs and headings to your videos. Version 2.3 also allows you to embed Spectrum, Waveform, Spectrum & Waveform, and Orbits as annotations before the MP4 is created.
The Waveform and Orbit can even synchronize playback with the video so you see the waveform as the motion happens.
See the videos at these links for examples of the two different behaviors:
Related Articles:
How do I measure displacement (velocity) in a recording?
RDI data files can consist of many different files and folders. Each recording stores a folder and a file on your computer which have the same name. The two must continue to be linked by the same name. You can change the name of the recording, but ALL files associated with this recording MUST get renamed exactly the same. You could manually do this by finding the file and folder, then renaming each and every file in the folder with the same name, but this would be tedious and may lead to mistakes. The easier way is to use the RDI Motion Amplification® Software rename feature.
Follow these steps to rename a file:


Please watch the attached video as an example.
Related Articles:
Behavior in Version 2.3 and earlier:
In "Motion Amplification® " Acquisition Mode, when you have the "Camera Properties" Framerate field set to fps, Fmax will be half the entered frame rate. In "Displacement" mode, the "Framerate (fps)" field will change to read Fmax and it will display the actual Fmax value.
NEW BEHAVIOR after update to Version 2.4
To simplify the recording process, the Acquisition Mode and Lighting settings have been removed from the user interface. Now, Fmax will always be half the entered frame rate.
See the attached video to view this behavior.
Yes. You can create a video which plays both amplified and non-amplified footage. To do this:

15. Navigate to the "Videos" folder to find the exported video (default location - C:UsersUserDocumentsRDIVideos).
NEW BEHAVIOR after update to Version 2.5
The method for adjusting the Set Amplification Start and End positions was improved in Version 2.5. From that version on, you can simply click, hold and drag on the blue triangles and move their positions.
Link to Video of behavior in Versions 2.5 and Newer
NEW BEHAVIOR after update to Version 3.0
There is no longer a need to "Reamplify Recording" - Step 12 above. This will be done automatically when it is required. This option has been removed from the pop-up menu.
View the video below for an example.
Related articles:
How can I reduce the size of an MP4 export? (Export length)
Yes it does.
After the filter is applied, only objects moving at the same frequency will show motion. They may or may not be directly attached to the object of interest. In addition, as the attached report shows, you can filter different videos for the same frequency to find sympathetic vibrations in other locations.
This video report from Stuart Walker with Reliability Maintenance Solutions Ltd an Authorized Reseller of the Iris M™ System in the United Kingdom is an excellent example of how to use filters to determine root cause of a problem.
NEW BEHAVIOR after update to Version 2.1
Now, with the introduction of "Amplification Regions" you can specify that only a portion or portions of a recording be amplified. Then, by filtering you can specify that only the amplified regions get filtered.
Adjust the playback speed
This method is available in Versions 2.0 and newer.
Some motion may be shown better by adjusting the playback speed. Slower motions, for example may become more obvious at a faster playback speed. Adjusting the playback speed will also change the size of the MP4 created from the recording.
found to the right of the Playback BarAdjust the Playback Speed slider as necessary until you achieve the size MP4 you desire.
Watch the attached video for an example.
NOTE - The attached video is working with a 1 second video in real time. Only the Playback Speed is altered.
Related articles:
Why do some questions have multiple answers?
How can I reduce the size of an MP4 export? (Export length)
How can I reduce the size of an MP4 export? (Video Format and Quality)
How can I reduce the size of an MP4 export? (Original and Amplified Frames)
The Motion Amplification software can support all of the following filters as described in detail below. They can be applied individually or in combinations. In all of the examples below, the areas in green will be included in the video while the areas in red will be excluded. Because of their behavior, only one Bandpass, one Lowpass, and one Highpass filter can be applied to a video. You can use all three on the same video, but only one of each type. You can add as many Bandstop Filters as you need.
A bandpass filter will only allow frequency content between the low and the high cutoff to be amplified. All other frequency content will be excluded from amplification. When you select "Bandpass" from the "Type" dropdown, you will be allowed to enter your "Low Cutoff" and "High Cutoff" values. You can either use the keyboard to type values into the fields directly, or use the cursor to drag the red circles on the spectrum display to the area of interest. In the example below, only motion related to frequencies between 16.6 Hz and 17.8 Hz will be amplified in the video.

A lowpass filter will only allow frequency content below the high cutoff to be amplified. All other frequency content will be excluded from amplification. When you select "Lowpass" from the "Type" dropdown, you will only be allowed to enter your "High Cutoff" value. You can either use the keyboard to type the value into the field directly, or use the cursor to drag the red circle on the spectrum display to the area of interest. In the example below, only motion below 3.8 Hz will be amplified in the video.

A highpass filter will only allow frequency content above the low cutoff to be amplified. All other frequency content will be excluded from amplification. When you select "Highpass" from the "Type" dropdown, you will only be allowed to enter your "Low Cutoff" value. You can either use the keyboard to type the value into the field directly, or use the cursor to drag the red circle on the spectrum display to the area of interest. In the example below, only motion above 16.6 Hz will be amplified in the video.

A bandstop filter will exclude frequency content between the low and the high cutoff limits and all other frequency content will be amplified. When you select "Bandstop" from the "Type" dropdown, you will be allowed to enter your "Low Cutoff" and "High Cutoff" values. You can either use the keyboard to type values into the fields directly, or use the cursor to drag the red circles on the spectrum display to the area of interest. In the example below, all motion EXCEPT frequencies between 16.6 Hz and 17.8 Hz will be amplified in the video.

The above filters can be combined to create complex scenarios. Below is an example where the intention is to include the 40 Hz and the 120 Hz frequency content in the amplification process. Three filters are required. First, a highpass with a cutoff just below the lower frequency of interest. Second, a bandstop between the two frequencies of interest. Finally, a lowpass with a cutoff just above the higher frequency of interest. As noted on the right-hand side of the window, the green portions of the spectrum are the only frequencies that will be included in the amplification process. The red and grey portions of the spectrum will be excluded.

The filters that have been applied are listed in the Recording Information.

They will be in the units that were selected at the time of the export. The header of the CSV file will also show you the units label.

INCLUDE the original AND amplified frames
This method is available in Versions 2.0 and newer.
To reduce the size of the MP4, you can change the export content to include the original and amplified frames from the "Motion Amplification® Options" settings. You will find these settings by clicking the Gear Icon in the upper right-hand corner of the Motion Amplification® window.
See the attached video for an example.
NOTE - The attached video works with a 1 second of real time recording at 100 fps playback speed.
Related Articles:
Why do some questions have multiple answers?
How can I reduce the size of an MP4 export? (Export length)
How can I reduce the size of an MP4 export? (Playback speed)
How can I reduce the size of an MP4 export? (Video Format and Quality)
Yes. Clicking the filter icon with an active ROI will pre-populate the spectrum window with the spectrum from that ROI.
See the attached video for an example.
The original video is composed of an individual file and a folder which both have the same name. The file will end in .RDI and is recognized by the Motion Amplification® software as a known file type. Clicking it will launch the Motion Amplification® software and load the video.
In order to send the raw video, you must send ALL files with the same file name. One way to do this is to create a "Compressed" or "ZIP" file with all the contents in one folder.
Also, see the attached video for an example of how to do this.
NOTE - Motion Amplification® videos can get rather large. Be conscious of the file size limits associated with emailing large files. Sometimes, alternate methods of transferring files may be necessary.
Related Articles:
How do I extract Files from a Compressed (Zipped) Folder?
This article applies to Software Versions 1.0 and 2.0 or for sending the raw data without using Motion Explorer. For instructions on how to use Motion Explorer (Introduced in Version 2.1) to Export raw video, please see the related article named How do I "Export" then "Import" files using Motion Explorer?
The spectral lines of resolution will be equal to half the number of images collected in the recording.
Appearance and Behavior in Version 2.5 and Newer
In Version 2.5, the "Duration Type" field was removed to make the user interface easier to use. In this mode, you will always enter the "Duration" value.

To find the number of frames, look in the bottom left-hand corner in the "Calculated Values" section:

Appearance and Behavior in Version 1.0 through Version 2.4
If the "Duration Type" is set to "Number of Frames" it will be based on the number you entered. If the "Duration Type" is set to "Time(sec)", it will be as shown in the lower left corner under the "Calculated Values" heading.
The Number of Frames entry under the "Recording Properties" when recording in Frames:

The Number of Frames as found under the "Calculated Values" heading when acquiring for a specified time:

Related Articles:
What are the issues with connecting to a wireless network?
There should not be a problem connecting to a wireless network. The assumption here is that you are using the Iris M™ user that the system came with and not using a separate log on. This is similar to what you did in class at RDI Technologies™. This will also work in a hotel room when you are traveling.
What are the issues with connecting to my work network?
Version 2.5 and Earlier behavior:
This is where things can get complicated. First a specific log on and credentials may be required. While it's easy to create a new account on the acquisition device, the RDI software will not be able to access the license through this account. As long as the Iris M account remains active you can continue to access the account. The license can be transferred to the new account by contacting RDI support. To summarize, the RDI license is limited to one user on the acquisition device.
Another thing to consider is if your IT department requires virus scanning software it may interfere with the RDI software. The hardware was chosen because of it's performance as a system, any changes to the system may reduce it's performance. This may result in slow recording speed, reduced image size or overall sluggish performance.
NEW BEHAVIOR after update to Version 3.0
You can now create and use multiple accounts which can all use the Iris M software. The accounts must be on the same computer and cannot use the software simultaneously.
Related Articles:
How many users will the software license support?
On how many devices may I install the RDI Technologies™ Iris M™ software?
My Iris MX™ download is slow or generates error messages. What can I do to fix this?
The Iris M™ software makes use of a 'Region of Interest' (ROI). This is a small box drawn on the screen at various times during either the Acquisition process or Analysis process. This region has the following uses:
Select the location that you want to measure. Place the cursor in this location and left-click and drag to create an ROI around this area. The Motion Amplification® Software will measure displacement (velocity) within the box. You can then open the Time Waveform or Spectrum windows and see the values.
See the attached video for an example.
Related Articles:
They do not. You can, however, add annotations in the form of arrows, circles, boxes or text to show your audience where to look.
The attached video shows you an example.
NEW BEHAVIOR after update to Version 2.3
Now, you can include your ROIs, and many other annotations, in the exported MP4 video. When you click the "Export Video" icon, you will be presented with the screen shown below. Click the "Include Data Plots" check box and then select the items you want to include in the video.

In this case, the frame rate is too close to the edge of limitations of the camera's performance. If the red exclamation mark is coming and going and you happen to press record when it's green you can start the recording and have subtle problems like frames acquired at inconsistent rates in the recording. Reduce the slider for frame rate/Fmax by a few frames per second. You can also close all other open software to free up computer processing power.
The location of the Framerate status icon and tool tip:

The Framerate status icon showing a framerate which the camera cannot resolve:

Please let us know what you find. To date, we've only tried drawing 100 Regions of Interest on a single video!
Here is how to switch between the side by side display of original video and amplified video and the amplified video only:


or

You can toggle between the two as necessary.
NEW BEHAVIOR after update to Version 2.3
Now, this selection is made when you create the MP4. After you click the "Export Video" icon, you will be presented with the window below. The selection is circled in green.

The attached video will also show the steps.
Behavior in Version 1.0 and Earlier
Viewing Spectrum and Waveform data are not available in these versions.
Behavior in Version 2.0 through Version 2.2
The annotation features inside the Motion Amplification® software allow you to embed text messages in the final exported MP4. You can use these features to document amplitude measurements.
NEW BEHAVIOR after update to Version 2.3
Use Motion Amplification® to add dynamic graphs to your videos. Version 2.3 also allows you to embed Spectrum, Waveform, and Orbits as annotations before the MP4 is created.
The Waveform and Orbit can even synchronize playback with the video so you see the waveform relative to the amplified motion.
See the videos at these links for examples of the two different behaviors:
Behavior in Version 2.3 and Newer.mp4
Behavior in Version 2.0 and Version 2.2.mp4
Related Articles:
Do my ROIs show in the exported MP4?
How do I measure displacement (velocity) in a recording?
No.
If you do not amplify a recording when it is taken, it will get amplified the first time that it is opened in Motion Amplification®.
NEW BEHAVIOR after update to Version 2.5
Motion Explorer has added a tool which allows you to amplify multiple recordings at the same time. See the related article below for details.
Related Articles:
Installing new software or updating your existing version will follow the same procedure as described below:
1. Click on the following link to download the latest version
2. When the download has completed, open the Downloads folder
3. Copy the "CableView+v2.6+Install.zip” file to a USB device (Optional)
4. Take the USB drive to the CableView Acquisition Device (Optional)
5. Copy the “CableView+v2.6+Install.zip” file to the desktop of the RDI Acquisition Device (Optional)
6. Right-click on the “CableView+v2.6+Install.zip” file and select “Extract All…”
NOTE - The extracted files must be on the local computer. You cannot install from the USB drive or a network location.
7. Confirm the default desktop destination by clicking “Next”
8. When extraction is complete, the extracted file location should open automatically
9. Right-click on the “setup.exe” file
10. Left-click on the “Run as administrator” action
11. Follow the on-screen prompts to complete the software upgrade or installation
NOTE - The download contains the newest version available. In some cases the version references above may not exactly match the version in the download which will always be the newest version. In any case, the instructions remain the same regardless of the version that you download.
Please make sure that you are using Version 1.2.0 of the Crown Castle spreadsheet to enter data and upload to the CableView program.
If you do not have the latest version of the Crown Castle spreadsheet contact Crown Castle directly or RDI Technologies™ by submitting a Support Request here: http://rditechnologies.com/support/
Begin by opening Motion Amplification or RDI Acquisition (a camera connection is required for Acquisition). Once the application has opened click the gear in the upper right hand corner.  Then, under "UI Options" find and click the Tablet bubble and click OK.
 You will be presented with this window.

Now click OK, the software will close.
The next time you open Motion Amplification it will be in Tablet mode.
The Zoom Lens supplied with the Traveler System has Focal Length settings which are not listed in the Drop Down list. There are focal lengths printed on the Zoom ring of this lens. To add a "Custom" lens, do the following:


Please see the attached video for a demonstration.
Related Articles:
How should I measure distance when using the Zoom Lens?
We still recommend measuring the distance to your target from the front of the lens. This is the same plane of reference we recommend when measuring with the fixed focal length lenses.
There are definitely factors which could compromise accuracy when using the Zoom Lens. These include but may not be limited to the inability to exactly determine the focal length setting, the length of the lens, the depth of field, and the sharpness of the focus.
At 3', a 1" difference in the distance to the target results in a 3% error. This error is further reduced at 10' so that a 1" error in the distance results in a 1% error. These differences are relatively minor when compared to measurements taken with a vibration sensor which typically has a tolerance of +/-10%.
We recommend consistency and as much accuracy as possible, but the most powerful use of the software is to convey the message of the motion. Motion Amplification will amplify and show the motion regardless of the lens used or the distance to the target.
Related Articles:
Loosen the first knurled ring closest to the mounting threads, identified by the red arrow in the image below. This will allow you to rotate the lens barrel and align the locating numbers on the focus and aperture rings with the top of the camera. After aligning the lens the way you like, don't forget to tighten up the knurled ring to prevent it from rotating to the bottom again.

Related Articles:
You'll find the Date, Time, and Number formatting in windows under the "Regional" settings.
In the Search Bar, type "Region" and select "Region Settings".

On the Language & Region settings page, expand the "Regional Format" section by clicking the down arrow on the far right side of the "Regional Format" bar. Highlighted with the green arrow below.

Click on the "Change formats" button in the bottom right-hand corner of the window.

If the next set of windows shows enough selections to satisfy your needs, you can change the settings here.

If you still want to change more settings, like the number formatting, return to the "Language & region" settings page and select "Administrative language settings".

A new window will appear. You can change some of the settings from this page. There are still others available from the "Additional Settings..." button.

This is where you'll find the Number formatting tab.

Once the settings are configured as you desire, click OK to start closing the windows. Close all available windows and reboot your system.
Yes!
From the Company or Folder levels, you can right-click on the Name, Description, and Size column headers and sort the column:

From the Collection level, there are additional column types available:

Place the pin and adjust the grab handles to hit the border of the location you are measuring.

Click off of the pin which will remove the grab handles. The best accuracy is obtained when the measuring line touches the edges of the object you are measuring.

Write something and get some videos.
And why?
Keep "gross motion". Transient doesn't change or reset locations.
No. Noise Reduction only cleans up the Visual presentation of the video. The measurement data is unchanged.
Rotor Kit, 25x amplification, Noise Reduction inactive (icon not grey - shown in green box):

Rotor Kit, 25x amplification, Noise Reduction active (icon grey - shown in green box) :

Max X Pk-Pk measurement: 0.921 mils. Max Y Pk-Pk measurement: 0.614 mils for both recordings:

Different users may have to name DAQ parts again.
Troubleshooting "No hardware detected" message.
Block diagram
Rename DAQ cards
Get a hammer
Get a cable (2 Female BNC to Female BNC) - Camera Sync and Hammer to DAQ
Related Articles:
Where can I purchase a Modal Hammer to work with Modal Amplified™?
Refresh My License
Camera to PC (Std USB)
Installing new software or updating your existing version will follow the same procedure as described below:
READ THIS FIRST:
1. Before starting the installation process: Please be aware, your software support must be current. You can check your expiration date by following these instructions. If you have any questions about your software support please email [email protected].
2. Please check the Microsoft BitLocker encryption setting on your computer BEFORE starting this process. If the BitLocker is turned ON and you do NOT have the key, you will lock up your hard drive and lose all of your data!!
Follow these instructions to check and disable the BitLocker if you do not intentionally have it turned on.
3. Click on the following link for the software bundle you are trying to update or install
Software Installation Package for Modal Amplified
4. When the download has completed, open the Downloads folder
5. Copy the "v3.6+Modal+Amplified.zip” file to a USB device (Optional)
6. Take the USB drive to the RDI Technologies™ Acquisition Device (Optional)
7. Copy the “v3.6+Modal+Amplified.zip” file to the desktop of the RDI Acquisition Device (Optional)
8. Right-click on the “v3.6+Modal+Amplified.zip” file and select “Extract All…”
NOTE - The extracted files must be on the local computer. You cannot install from the USB drive or a network location.
9. Confirm the default desktop destination by clicking “Next”
10. When extraction is complete, the extracted file location should open automatically
11. Right-click on the “setup.exe” file
12. Left-click on the “Run as administrator” action
13. Files downloaded from the internet will probably display the following caution message:

14. Click on the "More Info" link highlighted in Green below:

15. After you click the More Info link, you will see details about the publisher, it should read "RDI Technologies Inc". The "Run Anyway" button will appear. Click Run Anyway to begin the installation.

16. Follow the on-screen prompts to complete the software upgrade or installation
NOTE - The download contains the newest version available. In some cases the version references above may not exactly match the version in the download which will always be the newest version. In any case, the instructions remain the same regardless of the version that you download.
Please see this link for our currently recommend Modal Hammers:
Modal Hammers from PCB Piezotronics
Related Articles
Do I need to do anything special to use my Modal Amplified™ System for the first time?
(First two questions from Luca with Mason's answers.)
1) Q: why I can activate the On-demand mode only?
A: The RDI Tablet will need to receive and action from the Spot tablet before allowing you to utilize Interactive Mode. When teaching spot a mission in an autowalk, the communication will pass back and forth between the two tablets until you complete the mission. If you push the big red '+' on the spot tablet and select the Data Acquistion RDI and give it a name, the RDI tablet should receive it and allow you to begin to configure a New Trigger (Trigger in this instance refers to your camera view)
Want to learn more? For more information or a quote on our products or services, please contact us.