GET IN TOUCH.
Want to learn more? For more information or a quote on our products or services, please contact us.
The first ROI that was drawn will be the one that pre-populates the Filter Specification window.
You will find this selection behind the "Application Settings" gear in the upper right-hand corner of the Motion Amplification® software. Simply open the dialog window and make your selection. Because the amplitude units can depend on the frequency, the associated plots will not be redrawn until they are reactivated.
The attached video shows you how.
You will find this selection behind the "Application Settings" gear in the upper right-hand corner of the Motion Amplification® software. Simply open the dialog window and make your selection. All of the associated plots will be changed when you save the new settings.
The attached video shows you how.
Yes. While viewing either a Time Waveform or Spectrum display, right click in the plot area. From the new pop-up menu, select "Setup Options". The new window contains drop-down selections which allow you to individually select how you want your plots to display.
See the attached video for a demonstration.
The aperture ring is a collar on the lens that can be rotated to increase or decrease the opening of the aperture petals. These opening settings are marked on the aperture ring as "f-stop" values. The smaller the f-stop value, the larger the opening and the more light reaching the camera's detector. See the examples of different aperture settings in the image below.
Examples of different aperture settings

The convenient part about aperture settings is that the amount of light taken into the camera at a particular setting will be equal across different lenses. If you find a good setting for your configuration and decide you need to change lenses, you can use the same f-stop with the new lens.
Location of aperture and focus rings on the Iris M Lenses
6mm (Blue) lens

12.5mm (Green) lens

25mm (Yellow) lens

50mm (Orange) lens

100mm (Red) lens

Location of aperture and focus rings on the Iris MX Lens
6mm (Purple) lens

Location of aperture and focus rings on the Iris M Traveler Manual Zoom Lens

Related Articles:
What is the Gain slider for and how do I use it?
The standard warranty period for all of the hardware in the initial purchase of an Iris M is one year.
Additional years of hardware warranty can be purchased at the time of the initial purchase.
Please contact RDI Technologies™ directly to file a warranty claim using the contact information found here: RDI Technologies™ Support
Related Articles:
What are the hardware warranties for my Iris MX™ System and how do I make a warranty claim?
What are the hardware warranties for my Iris CM™ System and how do I make a warranty claim?
By using Microsoft Word or similar programs, you can cut and paste the Time Waveform and/or Spectrum Plots for viewing. You can also place your large video files on a server and insert hyperlinks into your document to keep from having to email large video files.
NEW BEHAVIOR after update to Version 2.1
In this version, there are two new menu items in the Waveform Plots window which easily allow you to save the plot as an image.


NEW BEHAVIOR after update to Version 2.3
Now, the majority of your reporting needs can be filled by using Motion Studio. Motion Studio brings paper reports to life by including everything in a single video. You can still use these techniques, but instead of adding it to a paper report, you will be using the images in a video presentation.
Related Articles:
For Video Acquisition - Because you need the USB ports, using the Surface Book as a tablet takes a little creativity. But, if you detach the tablet from the keyboard, turn it around, reattach it, and close it up - this is a little awkward because of the extra protective case - you can use the stylus and onscreen keyboard to acquire data.
For Motion Amplification® - You can detach the tablet and use the Motion Amplification® software. Here again, use the stylus and onscreen keyboard as necessary.
Microsoft Surface Book 2 Update (released about Nov 2017)
The stylus is no longer standard with the Surface Book 2 according to Microsoft.
One of the biggest challenges when recording outdoors is lighting. Outside, you have access to a huge DC light source, the sun, so you would think you would have ample light. But, the sun may not always be where you want it or unblocked. On days when the sky has a scattered cloud layer, you may find yourself drifting in and out of good lighting. We had one instance where for the final shot of the day, a cloud suddenly appeared and made the shot unusable. The only solution in this case was to rerecord the video!
Even when you are outside, you may find that you need to add external lighting. Typically, overcast or mostly cloudy days will provide the most consistent even lighting.
NEW BEHAVIOR after update to Version 2.5
 The "Saturation Tool" (icon above as found in the Acquisition software) may also give you some insights on how much the lighting is changing in a particular scene. As the lighting changes, the saturation tool will change in real time showing you changes in the lighting patterns.
See the attached video for a sample of what you may see using the saturation tool.
Related articles:
What are some of the challenges when recording indoors?
My recording flashes bright and dim during analysis when I move the Motion Amplification slider.
Accurate entries for Distance to target and Focal Length are REQUIRED for accurate displacement measurements. Displacement calculations depend on these entries with an error equivalent to the error in the measurements. The closer you are to an object, the more critical the accuracy of the entries becomes because the error has a larger impact. For example, a 1 inch (25 mm) error at 12 inches (305 mm) is a larger percentage (8%) than a 1 inch (25 mm) error at 100 inches (2540 mm) (1%).
Related Articles:
The Brightness slider adjusts the brightness of the image by changing the exposure time of the image. The larger the brightness level the longer the exposure time. This value is scaled from 0 to 100 percent. There are three ways to move the slider:
In the attached video the three adjustment methods are displayed. You can also see the effect that moving the slider has on the image.
NEW BEHAVIOR after update to Version 2.5
The Brightness slider plays an important part in Shaft Inspection recordings. Here, you want to set the Brightness slider as LOW as possible and the Gain slider as HIGH as possible. This allows for the shortest exposure time and clearest picture of a rotating shaft.
Related Articles:
In order to save and replay Raw Video files from another location, all of the original files must be transferred and stored in the same location. There will be a file folder and individual file which both have the same name. The individual file will end in ".RDI" and is recognized by the Motion Amplification® software as a known file type. Clicking it will launch the Motion Amplification® software and load the video.
To extract files from a Compressed (Zipped) Folder follow these steps:
Please see the attached video for a demonstration of the extraction process.
Related Articles:
How do I send Raw Video to a user who has RDI Motion Amplification Software for Analysis?
There is no specific maximum length of recording. It will depend on the available free Hard Disc space on the Acquisition Device. Keep in mind that processing time increases at a faster rate than recording time.
Related Articles:
When using RDI Technologies™ Acquisition Software, if you left-click and drag the cursor on the screen, you will draw a red box. This box becomes the "Region of Interest". The image will be cropped to include ONLY the video inside of this box. All surrounding images are ignored. You can use this to reduce the amount of data recorded and stored by the camera. This becomes useful as you try to record at higher Frames per Second or Fmax values.
Using the ZOOM icons simply allows the user to focus on a smaller portion of the video being recorded. This is useful for improving the focus of the image. The difference in this case, is that the image surrounding the current view is still recorded.
See below for examples (assume the asset in these pictures is always the same size):

The ZOOM icons in the RDI Acquisition or Motion Amplification® software:

Related Articles:
The Gain slider adjusts the sensitivity of the camera’s sensor. Use it sparingly. By increasing the gain, you will brighten your image, but you will introduce more noise and decrease the quality of the measurement. Sometimes this is necessary when the image is too dark. This value is scaled from 0 to 30.0. Always set the Brightness slider first, then add the least gain necessary. You may also want to add supplemental lighting to reduce the need for excess gain. There are three ways to move the slider:
In the attached video the three adjustment methods are displayed. You can also see the effect that moving the slider has on the image.
NEW BEHAVIOR after update to Version 2.5
The Gain slider plays an important part in Shaft Inspection recordings. Here, you want to set the Gain slider as HIGH as possible and the Brightness slider as LOW as possible. This allows for the shortest exposure time and clearest picture of a rotating shaft.
Related Articles:
During installation, the software contacts the RDI Technologies™ server and validates that installation on that computer.
This is true for both the Acquisition System and the Analysis Only installation on a second computer.
Related Articles:
Behavior in Version 2.3 and earlier:
Lighting is the biggest challenge when recording inside. Because indoor lighting is typically powered by Alternating Current (AC) the fluctuations in light intensity can be seen when using Motion Amplification®. One of the symptoms is found in the article: My recording flashes bright and dim during analysis when I move the Motion Amplification® slider. The Iris M™ System contains helpful tools to automate selecting compatible recording rates. Using the selections from the "Acquisition Mode," "Lighting," "Framerate (fps)" and "Fmax (Hz)" boxes under the "Camera Properties" section of the RDI Technologies™ Acquisition software will configure your recording for compatible frame rates giving you the best quality videos at all Motion Amplification® settings.
Be aware, we have even seen flash rates at frequencies "around" line frequency. So, your filters may have to be adjusted slightly to eliminate the actual frequency.
NEW BEHAVIOR after update to Version 2.4
To simplify the recording process, the Acquisition Mode and Lighting settings have been removed from the user interface. Now, all that is required is to slide the "Framerate (fps)" slider to the needed setting.
See the attached videos for locating and using these controls.
Related Articles:
What are some of the challenges when recording outdoors?
My recording flashes bright and dim during analysis when I move the Motion Amplification® slider.
Check things in this order:
Related Articles:
There are several prerequisite software packages installed with the Iris M™ software. Some configure the camera, some the video display. In some cases, your virus protection software may identify these prerequisites as potentially harmful and block their installation. You may have actually seen various pop-up warning messages during the initial installation. In order to make sure that the program gets installed as intended, we recommend that you disable all virus protection software during the software installation process. You can re-enable it after the installation has completed and the Iris M software will function normally.
Sometimes, if you install from the internet, or from within the ZIP file you downloaded, you may have troubles. You may also want to try reinstalling the software.
Related Articles:
The only way to raise the frequency resolution is to increase the time of the recording. Frequency resolution can be expressed as 1/t where t = recording time. For example, a recording time of 1 second will allow you to resolve to 1Hz, at 10 seconds you can resolve to 0.1 Hz, at 20 seconds you can resolve to 0.05 Hz.
Related Articles:
This behavior has changed several times since it was first introduced. In some cases, the original behavior was retained, in some cases, it has been improved and updated. Please see the instructions below for the specific versions.
Appearance and behavior in Version 2.0
![]()
In Version 2.0, the ROI icon will appear as shown above. To add multiple ROI's in your video you have to left-click, hold and drag the first box. It will be RED in color. To draw the second box, you had to press the Control [CTRL] key then left-click, hold and drag additional boxes. New boxes will be BLUE, GREEN, ORANGE, YELLOW, PINK, then RED with this sequence repeating. Between each ROI, you have to wait for the measurement calculations to complete before starting to position the next ROI.
Appearance and behavior in Version 2.1

In Version 2.1, the ROI Icons were changed to those shown above. In this version, a "Persist" mode was added.
When the Motion Amplification® software is set to "Standard Mode", your icon will look like this: ![]() . In this mode, you add multiple ROIs by following the same procedure as described above for Version 2.0.
. In this mode, you add multiple ROIs by following the same procedure as described above for Version 2.0.
When you click on the down arrow between the two icons, your icon will change to this: ![]() . To draw ROIs in this mode, you only need to left-click, hold and drag with your mouse. Every time you release, an ROI will appear. When you click another location, you will begin drawing a new ROI. Between each ROI, you have to wait for the measurement calculations to complete before starting to position the next ROI.
. To draw ROIs in this mode, you only need to left-click, hold and drag with your mouse. Every time you release, an ROI will appear. When you click another location, you will begin drawing a new ROI. Between each ROI, you have to wait for the measurement calculations to complete before starting to position the next ROI.
To switch between the two, simply click on the arrow to the right of the ROI icon,  . Choose the mode you would like to activate and click on the name to close the menu:

Appearance and behavior in Version 2.2

In Version 2.2, Standard Mode was changed to "Independent Mode" as shown above. The behavior is still as described in Version 2.0 above, only the name was changed. "Persist Mode" behaves as described in the Version 2.1 section above.
Appearance and behavior in Version 2.3 and Version 2.4
![]()
In Version 2.3, the ROI Icon has returned to the original design. However, the behavior is as described under "Persist Mode" in Version 2.1 above. Simply left-click, hold and drag to add ROIs to the video. You can still hold the CTRL, left-click and hold to draw multiple ROIs as well.
You can now click the "Cancel" button as the first measurements are calculated. Early measurements will be suspended until all of the ROIs are placed. Allow the measurements to calculate after placing your LAST ROI and all previously placed ROIs will have their measurements calculated at once saving you time.
For example, if you want to place four ROIs in your video, you can left-click, hold and drag to place the first ROI. As the measurement dialog appears, click "Cancel" and place the second and third ROIs in this same manner. When you place the fourth ROI, allow the measurements to calculate and all four will be presented when done.
Appearance and behavior in Version 2.5

In Version 2.5, the order of the two ROI icons is reversed. Delete is on the left and the Type of ROI selection is on the right. In this mode, you place ROIs by left-clicking, hold and drag in the area where you want to ROI. You can place multiple ROIs by continuing this process everywhere you want an ROI. You can suspend the measurement calculations and complete them with the last ROI placed by clicking the "Cancel" button as the calculation window appears.

In this version, you have two new ROI types, the “Horizontal Shaft” and the “Vertical Shaft” measurement tools. As the icons indicate, you will be able to measure shaft movement on a shaft which is recorded horizontally using the Horizontal Shaft tool. Shafts recorded in a vertical orientation are measured using the Vertical Shaft tool.
Appearance and behavior in Version 3.0

The ROI Icons appearance is unchanged in Version 3.0, but there is a new “Transient” ROI tool.

This type of ROI will track translational movement and show you the path of such motion.
PURPLE was introduced as a 7th color in the sequence in this version. Now the color cycle, RED, BLUE, GREEN, ORANGE, YELLOW, PINK, PURPLE, RED, will repeat.
Appearance and behavior in Version 3.1
The left "Delete ROI" icon has been removed. The ROI Type selection list remains unchanged when clicking on the down arrow to the right of the ROI tool.

To delete an ROI, select it and then select "Delete/Delete All ROIs" from the pop-up menu.

Appearance and behavior in Version 3.5 - Delayed Measurement Calculations for individual ROIs
You can now place multiple ROIs at one time and delay calculating the measurements until after the last ROI is placed.
To place multiple ROIs press and hold the Control [CTRL] key on the keyboard. Then, left-click hold and drag to draw an ROI box. Release the left mouse button. The ROI will appear with a cross through the center. Continue to hold CRTL and draw the next box. Place as many ROIs as necessary. When placing the final ROI, first release the CTRL button, then click hold and drag to place the final ROI. When you release the left mouse button, all calculations will be performed.
Appearance and behavior in Version 3.7
Now, when placing multiple ROIs, the calculations begin as soon as the CTRL button is released.
New in Version 3.7 - Fixed Size ROIs
A new ROI type is added to the selection list. Selecting this option will allow you to click-hold and drag ROI boxes in the image. When you finish drawing the box, it will immediately resize to a specific size.

The first time you use this feature, the dialog below will appear. It explains where to locate the settings for the Fixed Size ROI box.

At the bottom of the "ROI Options" section of the Motion Amplification Options window, you can define the Width and Height you would like the Fixed Size ROI boxes to be.

You can place multiple Fixed Size ROIs by pressing and holding the Control [CTRL] key on the keyboard. Then, left-click hold and drag to draw an ROI box. Release the left mouse button. The ROI will appear with a cross through the center. Continue to hold CRTL and draw the next box. Place as many ROIs as necessary. After placing the final ROI, release the CTRL button and all calculations will be performed.
Pressing and holding the Alternate [ALT] key will cause a Fixed Size ROI to be placed every time you single click a location.
The above two actions, holding [CTRL] and [ALT] keys together, will change ROI placement to place a fixed size ROI every time you single click in the image. Releasing the two keys will cause all recently placed ROIs to perform their measurement calculations.
New in Version 3.7 - Duplicate ROIs
Select an ROI box. The "Edit Grab Handles" will be displayed. Once an ROI is active, right-click in the area. The new pop-up menu will show a new option to "Duplicate ROI/Duplicate All ROIs". Selecting Duplicate ROI will cause the software to place an identical ROI Type and Size near the original. If the ROI is named, the name of the new ROI will match the existing format. You can then drag the new ROI to the desired location.
Selecting "Duplicate All ROIs" will place a second identical ROI near EVERY ROI in view. Be careful! Duplicating lots of ROIs adds up in a hurry!!
Related Articles:
In order to increase Fmax or Framerate (FPS), you must "crop" the collected image. The best way is to decrease the vertical resolution (Height) of the image which allows you to increase the acquisition rate. Decreasing the Width of the recording will also allow you to increase Fmax, but at a slower rate.
See the video below for exactly how to do this and just what it means. The items in the "Camera Properties" section of RDI Acquisition have changed over time to simplify things. There is one recording (Increasing Fmax in V2_3 and earlier.mp4) showing the original layout for the Camera Properties fields and one showing the current configuration (Increasing FPS in V2_4 and Later.mp4). The biggest difference is that in earlier versions, in what was called "Displacement" mode, the slider which controlled Framerate was named Fmax.
The the relationship between Framerate and Fmax is:
2 times Fmax = Framerate or
Framerate divided by 2 = Fmax.
Related Articles:
What is the difference between a Region of Interest (ROI) and Zooming the View?
When you create an account on the website, you'll automatically be included in the Software Release Email list. You'll also get notifications about upcoming Webinars designed to introduce new features released with each version.
Related Articles:
How do I update or install the software for my Iris M™, Iris MX™, or Iris CM™ Client System?
Processor: i7 is recommended, the newer generation of i7 processors is desirable and these are usually labeled 6th or 7th generation
Memory: 16GB of RAM minimum (32GB is highly recommended)
Hard Drive: SSD is not required, but will improve performance for stabilization, filtering, etc. If you do get a rotating HDD, we suggest using at least a 7200 RPM drive.
OS: 64-bit versions of Win 10 Pro or Win 11 Pro are the versions of Windows we have tested and support
Hard Drive Storage: If you are going to use the computer to transfer videos via Motion Monitor, you should choose a Hard Drive with at least 1TB of storage space.
On how many devices may I install the RDI Technologies™ Iris M™ software?
How do I update my Iris M™ software?
What is the difference between the RDI Acquisition Software, the RDI Motion Amplification® Software, the RDI Motion Explorer Software, the RDI Motion Studio Software and the Motion Monitor Software?
The first four software applications described below, used in conjunction with the Iris M Camera, make up the IRIS M™ System:


The three Applications described below are needed when purchasing additional hardware offered by RDI Technologies to support additional capabilities within the Iris M Suit of Motion Amplification® products:


Every Iris M™ System comes with two different licenses.
The "Acquisition Device" delivered with the Iris M System will be licensed with the Acquisition License when it is delivered. A second license is delivered with the Iris M System that is designed to be Activated on a computer supplied by the purchaser of the Iris M System (What are the minimum computer requirements for installation of the Stand Alone Analysis Software?).
When you download and install the RDI Iris M Software suite, it installs all of the available Applications in the entire software suite. Icons for unlicensed features can be moved to your Recycle Bin to clean up your Desktop if you like. Your license will determine which Applications can run with each installation as described below:
Acquisition License ID
This License will authorize the following Applications to run:
1) RDI Acquisition
2) Motion Explorer
3) Motion Amplification®
4) Motion Studio
Analysis Only License ID
This license will authorize the following Applications to run:
1) Motion Explorer
2) Motion Amplification®
3) Motion Studio
Only one license needs to be Activated per device. Therefore, you can actually run Motion Explorer, Motion Amplification®, and Motion Studio on two different devices.
The RDI Technologies Software Suite will also install:
Motion Monitor - Specifically designed to configure and start the monitoring process on the Iris CM System. (Iris CM description on the RDI Technologies™ Website)
Mission Explorer - Specifically designed to configure and control the Iris Explorer Spot® Payload. (Spot® Payload description on the RDI Technologies™ Website)
Related Articles:
Your Iris M™ Acquisition System is delivered with a USB Memory Stick with an RDI Technologies™ logo. On that stick you will find the licenses issued with your system. The same files have been copied to the "Downloads" folder and the Desktop on the Acquisition System. The License file will typically be identified by your company name and may also include a contact name from your company. The file will be in a Text format. See the "Typical Files on USB Stick" figure below.
Typical Files on USB Stick:

If you cannot find your License details, please contact Support by emailing any one of the details from your system - Acquisition Device Serial Number, Camera Serial Number, 6mm Lens Serial Number OR 100mm Lens Serial Number - to [email protected] and we can supply them to you.
After you open the text file, you will see that there are two licenses delivered with your Iris M Acquisition System. ("Typical License File" figure below.) The first, which is preinstalled in the system before delivery, is the "Full" or "Acquisition System" license which will activate the RDI Acquisition, Motion Amplification®, Motion Studio and Motion Explorer software. (For the difference between these see this article: RDI Technologies™ Acquisition Software vs. RDI Motion Amplification® Software vs. RDI Motion Explorer Software vs. RDI Motion Studio Software vs. Motion Monitor Software) This license is already active when you receive your system. You should see the four different icons associated with the RDI Acquisition, Motion Amplification®, Motion Studio and Motion Explorer software on your desktop when you first boot up the system.
Typical License File:

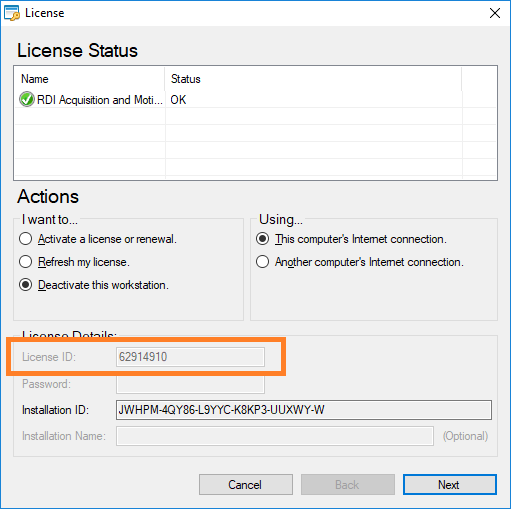
The second license will be identified as "SA" or Stand Alone or "Analysis Only". These three labels are all the same. This license is used to activate the Motion Amplification®, Motion Studio, and Motion Explorer software on a second analysis computer. When prompted, enter the license information into the license screen and select "Activate a license or renewal" as shown in the figure below.
License Activation Window:

When Activating either license associated with the Motion Amplification Iris M System, Acquisition or Analysis Only as described above, please use the top selection shown on this window:

Related articles:
On how many computers may I install the RDI Technologies™ Iris M™ software?
What are the minimum computer requirements for installation of the Stand Alone Analysis Software?
Want to learn more? For more information or a quote on our products or services, please contact us.