GET IN TOUCH.
Want to learn more? For more information or a quote on our products or services, please contact us.
Your existing data (typically saved on the Acquisition Device before the introduction of Motion Explorer) can be added to a Hierarchy structure of your design by following these steps:
1) Create the directory structure you want using the "New Folder", "New Asset", and "New Collection" icons from either the ribbon or the right-click pop-up menu
2) Navigate down to the "New Collection" level and click the "Add File" or "Add Recording" icons from the ribbon or right-click pop-up menu
NOTE - Add File will add ANY file type to the hierarchy tree
Add Recording will only add .RDI video recordings to the hierarchy tree
If you are uncertain, it is safest to use the "Add File" option
3) After clicking Add File or Add Recording, the "Open" window will appear. Use this window to navigate to the location where your raw data is currently stored
4) Select as many files as necessary, keeping in mind that they are being stored in one specific collection, then click the "Open" button to begin the import. Selecting multiple files can be accomplished by:
a) Hold CTRL+Click to select files in any order
b) Hold SHIFT+Click to select consecutive files
5) Repeat this process for any and all collections as necessary
See the attached recording for an example of how to add files/recordings.
To move data:
1) Select any level of the hierarchy tree
2) Either use the "Move Files" icon from the ribbon or right-click and select "Move Files" from the new pop-up menu
3) When the "Destination Directory for File Move" window appears, use the "Browse" icon 
4) Click the "OK" button and the move will begin
NOTE - Make sure that there is enough room in the destination location to prevent any potential errors or data loss
See the attached video for a sample of the Move operation.
Related Articles:
What is the difference between "Move" and "Import/Export" when using Motion Explorer?
How do I "Export" then "Import" files using Motion Explorer?
First, you must Export raw data from Motion Explorer. Do this by:
1) Select the level in the hierarchy listing that you want to export. You can change this selection in Step 5 below before exporting.
2) Either select the "Export" icon from the ribbon or right-click and select the "Export" icon from the new pop-up menu
3) Make the desired selections in the "Export Specification" window
4) Select "Next"
5) Confirm or change your selections with respect to the Folders, Assets, or Collections that you want to export
6) Select "Finish" to begin the export
After you have exported the desired files, move them to a new computer. Then, to import them follow these steps:
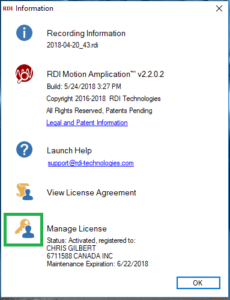
1) Select the highest level in the hierarchy, by default this was named "Company Name" but may have been customized at some point. It will have a "Factory" icon, like this one
2) Either select the "Import" icon from the ribbon or right-click and select the "Import" icon from the new pop-up menu
3) Use the "Select the export file of interest" window to navigate to the exported data. This file will have a ".EXP" file extension. Select the desired file
4) Click "Open" to complete the operation
Please download and view this example: Sample Export/Import Video
See also:
What is the difference between "Move" and "Import/Export" when using Motion Explorer?
When you use the "Move" function of Motion Explorer, all of your files are transferred from one storage drive to another. The original files are transferred to the destination and no longer reside in their original location. The description in Motion Explorer is updated with the drive letter and path of the new location.
When you use the "Export" function of Motion Explorer, all of your files are bundled into an "Export" file and an associated folder. You have the choice of deleting the raw data on the original computer or keeping both copies, the original and the exported version. If you choose to Keep the raw data, the Location shown in Motion Explorer will be the original path, not the exported path. If you choose to Delete the raw data, the entire file(s) will be deleted from the computer and inside of Motion Explorer. When you "Import" a previous export, the data will be placed back in the original Hierarchy as defined at the time of the Export.
The table below explains some of the differences between the results of a Move and an Export/Import:
| Move | Export | ||
| How does the free Space change on my AD | All data is moved to external drive | Delete on export will free space on AD | Without Delete - Copies exist on AD & external Drive/another computer |
| What can I Access from my AD | Original recordings as shown in the ME tree * | If saved, duplicate hierarchy tree and duplicate data | If deleted, no hierarchy exists any longer on AD |
| How many Steps to make the transfer | 1 - External Drive path will be shown in ME ** | 2 - Export from AD Import to Analysis Only | |
| How does my Hierarchy look / How to keep things Organized | Location changed to "D:" */** | Remains the same after import | |
| What level of my Hierarchy tree can I move | Minimum is by Collection | Pick and choose recordings | |
| What can I see at the destination | AD- original hierarchy retained ** | Original hierarchy following an import | |
| Possible use cases | Free up space on AD 'Archive' with 'access'* | Archive, Completely move to Analysis Computer | |
| Acquisition Device = "AD" | * - Access speed/capabilities depend on the speed of the external drive and connection. | ||
| Motion Explorer = "ME" | ** Files need to be manually added to appear in a Hierarchy of Analysis Installation | ||
Related Articles:
How do I "Move" files using Motion Explorer?
How do I "Export" then "Import" files using Motion Explorer?
Want to learn more? For more information or a quote on our products or services, please contact us.